Real-Time Clocks for Breadboard Projects
Just as I was about to make my video on qrpTracker, I melted the DS1307 real-time clock. Here's how it happened, and some solutions I found for breadboarding a real-time clock at 3.3v.
My problem, which apparently others share, was that I had a 3.3v power supply (off the USB FTDI device), and the DS1307 is rated at 5v. No probs, I thought, I'll use a battery pack. Four fresh alkalines seemed a bit too punchy so I dropped it down to three (with no regulation). This worked for a while, and then the DS1307 started to act strangely. I could set and read the time, but the clock would not advance. Clearly the on-board oscillator was not running. Back up to four alkalines, with nominal power of 6v.
A few minutes later, and I began to be concerned that our wood-burning stove had come in contact with some plastic: there was a funny smell. As the penny dropped, I put my finger on the DS1307, and was rewarded for my stupidity with an immediate blister. Turns out, the DS1307 operates at 5v and only at 5v. Don't give it 4.5 or 6, or it will stop and melt respectively.
My immediate solution was to use the DateTime Arduino library. In my setup() function, I called the following routine to seed the DateTime clock:
As the message says, you can get the right value to enter into this by running the unix command 'date +%s'. Of course, as soon as the power is removed from the Arduino, you have to re-seed the clock, but for some of my tracking work it is handy to be able to start the clock at a set point again and again. (For this, '1234567890' is a pretty handy seed value.) Incidentally, I found that this clock, running on my 3.3v ATMega328 at 16 MHz with an external resonator, lost about 30 seconds in a day.
So back to single purpose chips. I have 3.3v regulated through the FTDI, so what are the 3.3v equivalents of the DS1307? Again, I'm not the only one who was frustrated to find that there is no 3.3v RTC chip with battery back-up and I2C communiction available in DIL packaging. At least none that has code written for it in a widely-used library.
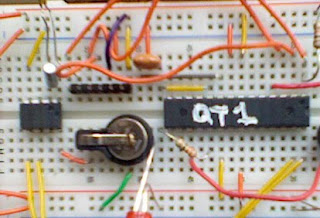
The closest thing is the DS1337. In fact, I ordered some of these from Digikey and only when they arrived did I realize that there is no Vbatt pin on which to put a backup battery. Without that, the situation wasn't much better than using the DateTime library . In the same Digikey order, I purchased some 10mm 3v lithium batteries, and a really nice holder that plugs firmly into my breadboard, as shown in the image. As you can see, the 10mm cells don't take up too much space on the breadboard. Yet how was I to provide backup power for the chip?
It's possible, of course, to rig something up with diodes to ensure that the Vcc doesn't charge the battery, but my solution was simply to run the DS1337 entirely off of the battery. I2 C doesn't seem to mind the separate power supplies. As it turns out, the DS1337 is much more efficient than the DS1307, so the capacity even of a 10mm cell should allow the chip to run for several months, if not over a year. That's good enough for a breadboarded project, as far as I'm concerned.
For permanent projects, I think the DS32C35 or DS32B35 is a better chip, especially if I can find a way to get at its FRAM memory storage. I have one soldered onto a breakout board and will experiment on it in the coming weeks.
My problem, which apparently others share, was that I had a 3.3v power supply (off the USB FTDI device), and the DS1307 is rated at 5v. No probs, I thought, I'll use a battery pack. Four fresh alkalines seemed a bit too punchy so I dropped it down to three (with no regulation). This worked for a while, and then the DS1307 started to act strangely. I could set and read the time, but the clock would not advance. Clearly the on-board oscillator was not running. Back up to four alkalines, with nominal power of 6v.
A few minutes later, and I began to be concerned that our wood-burning stove had come in contact with some plastic: there was a funny smell. As the penny dropped, I put my finger on the DS1307, and was rewarded for my stupidity with an immediate blister. Turns out, the DS1307 operates at 5v and only at 5v. Don't give it 4.5 or 6, or it will stop and melt respectively.
My immediate solution was to use the DateTime Arduino library. In my setup() function, I called the following routine to seed the DateTime clock:
void initTime() {
  Serial.print("Enter @Seconds since Jan 1, 1970: (unix command 'date +%s'):");
  if (getNumbersFromSerial() == false) {
    Serial.println("error");
    delay(500);
    initTime();
  }
}

boolean getNumbersFromSerial() {
 while(Serial.available() <  TIME_MSG_LEN ){ ;} // time message consists of a header and ten ascii digits so here use '11' in a #define
    if( Serial.read() == TIME_HEADER ) { // #define TIME_HEADER '@'
      Serial.print("good");
      time_t pctime = 0;
      for(int i=0; i < TIME_MSG_LEN -1; i++){
        char c= Serial.read();
Serial.print(c);
        if( c >= '0' && c <= '9'){
          pctime = (10 * pctime) + (c - '0') ; // convert digits to a number
        }
      }
      DateTime.sync(pctime);   // Sync Arduino clock to the time received on the serial port
      Serial.print("syncd");
      return true;   // return true if time message received on the serial port
    }
    return false;  //if no message return false
  }
As the message says, you can get the right value to enter into this by running the unix command 'date +%s'. Of course, as soon as the power is removed from the Arduino, you have to re-seed the clock, but for some of my tracking work it is handy to be able to start the clock at a set point again and again. (For this, '1234567890' is a pretty handy seed value.) Incidentally, I found that this clock, running on my 3.3v ATMega328 at 16 MHz with an external resonator, lost about 30 seconds in a day.
So back to single purpose chips. I have 3.3v regulated through the FTDI, so what are the 3.3v equivalents of the DS1307? Again, I'm not the only one who was frustrated to find that there is no 3.3v RTC chip with battery back-up and I2C communiction available in DIL packaging. At least none that has code written for it in a widely-used library.

It's possible, of course, to rig something up with diodes to ensure that the Vcc doesn't charge the battery, but my solution was simply to run the DS1337 entirely off of the battery. I
For permanent projects, I think the DS32C35 or DS32B35 is a better chip, especially if I can find a way to get at its FRAM memory storage. I have one soldered onto a breakout board and will experiment on it in the coming weeks.


Comments
Post a Comment